A long standing tradition, Easter eggs are an essential part of celebrating Easter. If the extent of your knowledge goes only as far as knowing how to dunk an egg in dye, there’s no need to worry. Here are a few step-by-step ways for a more creative holiday.
Basic Dyeing Techniques
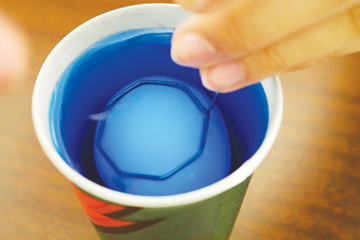
Step 1: For food coloring, put about 20 drops into one-half cup water. Most egg dyes are in tablet form. One tablet per cup of water seems to yield the best color.
Step 2: Wipe the outside of the shell with a damp paper towel or cloth to remove any yolk or dirt.
Step 3: Use the spoon to dip the egg into the dye and hold the egg under for about a minute then check the color. The longer you hold the egg in the dye, the deeper the color will be.
Step 4: After achieving the desired color, pat the egg dry with a paper towel and allow it to dry completely.
Tape Patterns
Materials: Food coloring or egg dye, hard boiled egg, water (2 cups), egg holder (or spoon), strips of tape
Step 1: Wipe the outside of the egg with a damp paper towel or cloth.
Step 2: Cut the tape lengthwise into strips of varying lengths. Wrap the tape around the egg to make a design.
Step 3: Follow steps three and four from “Basic Dyeing Techniques”
Step 4: Allow about a minute for the first layer of dye to dry then unravel the tape and repeat steps two and three, creating different patterns with the tape each time, until there are several layers of dye on the egg.
Dyeing with Wax
This technique will let you leave parts of the egg white, while dyeing the rest.
Materials: Food coloring or egg dye, hard boiled egg (optional: hollowed-out egg), water (about 2 cups), egg holder (or spoon), wax crayon
Step 1: Wipe the outside of the egg with a damp paper towel or cloth.
Step 2: Use a wax crayon to lineate or color in the parts of the egg where you don’t want the dye to cover. Then, follow steps three and four from “Basic Dyeing Techniques.”
Accessorizing
Stickers: Place various kinds of Easter-themed stickers on the egg to make patterns or a scene.
EggArounds: These plastic covers can be purchased at craft stores. Slip them around the center of a hardboiled egg then submerge the egg in boiling water for three to five seconds. The cover will shrink and wrap around the egg.
Animal eggs: Cut construction paper into various shapes and then glue them onto the egg to create animals. For example, use ovals, circles, and triangles to make a rabbit. Add a cloud shape to the other side to make a fluffy tail.
Sparkly Eggs
Cover your workspace with newspaper or other protective material. Fill several bowls with different colors of glitter.
Step 1: Spread a thin layer of glue across the outer shell of the egg then role the egg in glitter until it is evenly covered.
Step 2: Gently set the glue covered egg in a bowl of glitter. Use a spoon to cover the egg with glitter, making sure there are no empty spots.
Step 3: Gently remove the egg from the glitter. Set it on waxed paper and allow the glue to dry for an hour.
Optional: Use glitter glue and wipe it across the surface of the egg with a sponge or your hands.
You can use glitter to create designs, write messages and for various other things to decorate you Easter eggs.
Hot-glue Gun
Step 1: Squirt the hot glue onto the egg. We used an egg carton to hold them. Wide fat glue lines work well. Let the glue dry thoroughly.
Step 2: Drop them gently into the dye. We let them set about 10 minutes so that there would be a significant contrast in color.
Step 3: Apply glue, dye the egg, peel off the glue, add glue and dye it again to layer and mix the colors. The egg carton makes a great drying rack.























![AI in films like "The Brutalist" is convenient, but shouldn’t take priority [opinion]](https://hilite.org/wp-content/uploads/2025/02/catherine-cover-1200x471.jpg)





















![Review: “The Immortal Soul Salvage Yard:” A criminally underrated poetry collection [MUSE]](https://hilite.org/wp-content/uploads/2025/03/71cju6TvqmL._AC_UF10001000_QL80_.jpg)
![Review: "Dog Man" is Unapologetically Chaotic [MUSE]](https://hilite.org/wp-content/uploads/2025/03/dogman-1200x700.jpg)
![Review: "Ne Zha 2": The WeChat family reunion I didn’t know I needed [MUSE]](https://hilite.org/wp-content/uploads/2025/03/unnamed-4.png)
![Review in Print: Maripaz Villar brings a delightfully unique style to the world of WEBTOON [MUSE]](https://hilite.org/wp-content/uploads/2023/12/maripazcover-1200x960.jpg)
![Review: “The Sword of Kaigen” is a masterpiece [MUSE]](https://hilite.org/wp-content/uploads/2023/11/Screenshot-2023-11-26-201051.png)
![Review: Gateron Oil Kings, great linear switches, okay price [MUSE]](https://hilite.org/wp-content/uploads/2023/11/Screenshot-2023-11-26-200553.png)
![Review: “A Haunting in Venice” is a significant improvement from other Agatha Christie adaptations [MUSE]](https://hilite.org/wp-content/uploads/2023/11/e7ee2938a6d422669771bce6d8088521.jpg)
![Review: A Thanksgiving story from elementary school, still just as interesting [MUSE]](https://hilite.org/wp-content/uploads/2023/11/Screenshot-2023-11-26-195514-987x1200.png)
![Review: "When I Fly Towards You", cute, uplifting youth drama [MUSE]](https://hilite.org/wp-content/uploads/2023/09/When-I-Fly-Towards-You-Chinese-drama.png)
![Postcards from Muse: Hawaii Travel Diary [MUSE]](https://hilite.org/wp-content/uploads/2023/09/My-project-1-1200x1200.jpg)
![Review: "Ladybug & Cat Noir: The Movie," departure from original show [MUSE]](https://hilite.org/wp-content/uploads/2023/09/Ladybug__Cat_Noir_-_The_Movie_poster.jpg)
![Review in Print: "Hidden Love" is the cute, uplifting drama everyone needs [MUSE]](https://hilite.org/wp-content/uploads/2023/09/hiddenlovecover-e1693597208225-1030x1200.png)
![Review in Print: "Heartstopper" is the heartwarming queer romance we all need [MUSE]](https://hilite.org/wp-content/uploads/2023/08/museheartstoppercover-1200x654.png)
